Thank you for visiting SNEWPapers!
Sign up free
Story
April 15, 1941
Henderson Daily Dispatch
Henderson, Vance County, North Carolina
What is this article about?
A bridge hand analysis where declarer in 3NT loses an unnecessary club trick due to leading the wrong card from dummy, highlighting the importance of card order in play.
Clipping
OCR Quality
75%
Good
Full Text
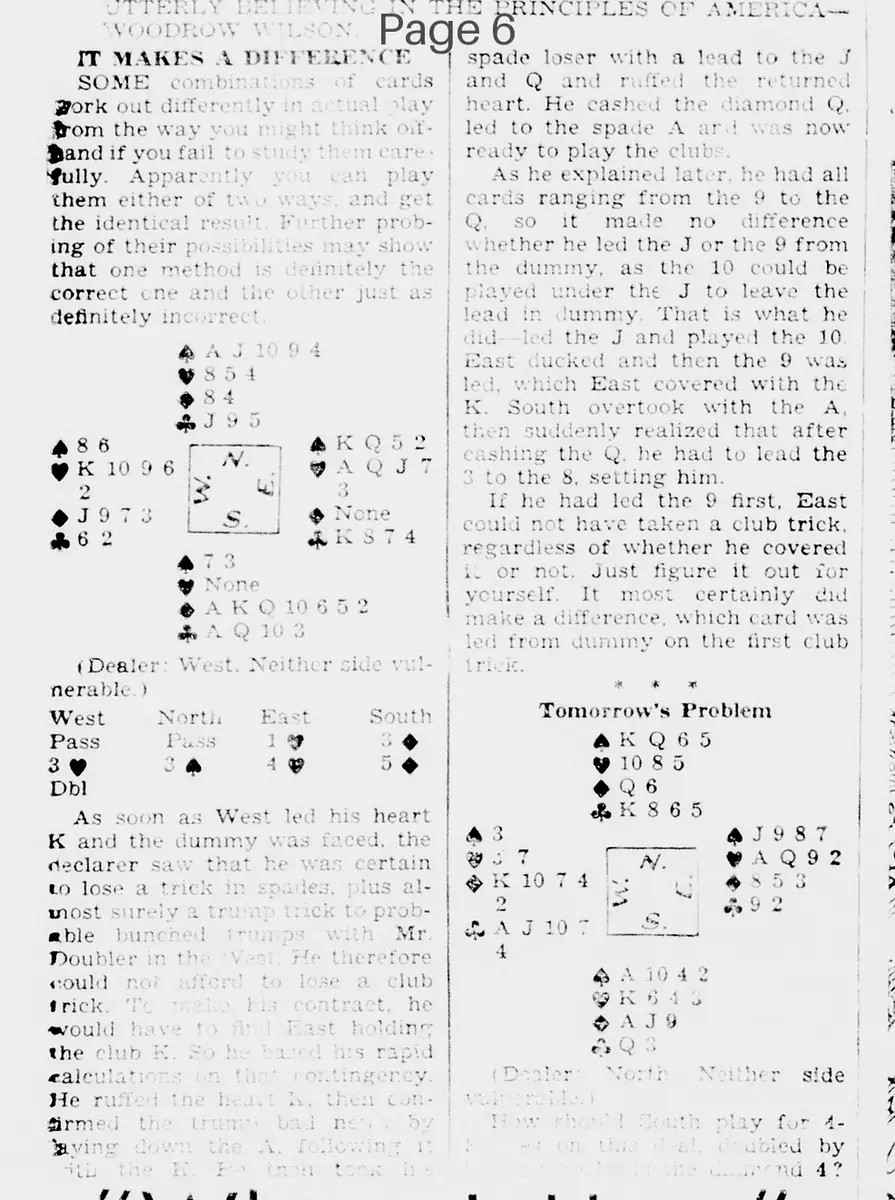
It makes a difference.
Some combinations of cards work out differently in actual play from the way one might think of them. And if you fail to study them carefully. Apparently you can play them either of two ways and get the identical result. Further probing of their possibilities may show that one method is definitely the correct one and the other just as definitely incorrect.
(Dealer: West. Neither side vulnerable.)
West North East South
Pass Pass 1NT 3H
Pass 3S Pass 3NT
Pass Pass Pass
As soon as West led his heart K and the dummy was faced, the declarer saw that he was certain to lose a trick in spades, plus almost surely a trump trick to probable buried honors with the doubler in the south. Therefore he could not afford to lose a club trick. The contract he would have last holding the club K 3. Then rapid calculation on contingency. He ruffs the high ace, then leads from dummy the ruff. Dummy's having 10 spade loser with a lead to the J and Q and ruffed the returned heart. He cashed the diamond Q led to the spade A and was now ready to play the club. As he explained later, he had all cards ranging from the 9 to the Q so it made no difference whether he led the J or the 9 from the dummy, as the 10 could be played under the J to leave the lead in dummy. That is what he did: led the J and played the 10. East ducked and then the 9 was led, which East covered with the K. South overtook with the A, then suddenly realized that after cashing the Q, he had to lead the 3 to the 8, setting him. If he had led the 9 first, East could not have taken a club trick, regardless of whether he covered it or not. Just figure it out for yourself. It most certainly did make a difference, which card was led from dummy on the first club lead.
What sub-type of article is it?
Curiosity
Mystery
What themes does it cover?
Moral Virtue
What keywords are associated?
Bridge Puzzle
Club Misplay
Card Combination
Declarer Error
What entities or persons were involved?
Declarer (South)
East
Story Details
Key Persons
Declarer (South)
East
Story Details
In a 3NT contract, declarer misplays the club suit by leading the jack from dummy first instead of the nine, allowing East to gain a trick that could have been avoided.